Planning a wedding is an exciting time filled with endless possibilities, and one essential element that can add a touch of elegance and charm to your special day is a DIY wedding arch. Whether you’re envisioning a rustic countryside affair or a romantic garden celebration, a wedding arch can create a backdrop that symbolizes love and unity. In this article, we will explore the key essentials you need to consider when creating your own DIY wedding arch, from materials and designs to decorations and personal touches. So, get ready to embark on a creative journey that will make your wedding day truly unforgettable. Planning your dream wedding involves careful consideration of every detail, and one crucial element that should not be overlooked is the wedding arch. A beautifully designed arch serves as a stunning focal point for your ceremony, providing the perfect backdrop for exchanging vows and capturing timeless photos. While there are various pre-made arches available for purchase, opting for a DIY wedding arch allows you to add a personal touch and tailor it to your specific design and style preferences. In this guide, we will explore the essentials of creating a DIY wedding arch, from selecting the materials and design to assembling and decorating it, taking into account important factors such as budget, location, weather considerations, legal requirements, and the timeline of your wedding planning journey.
Materials
To begin your DIY wedding arch project, you need to decide on the materials you would like to use. There are several options to choose from, each offering a unique aesthetic appeal. Wooden poles provide a classic and timeless look, while metal pipes offer a sleek and modern design. PVC pipes are lightweight and budget-friendly, making them a practical choice. If you desire a more natural and bohemian vibe, bamboo or driftwood can be perfect options. Consider the overall theme and style of your wedding when selecting the materials for your DIY wedding arch.
Design and Style
Once you have selected your preferred materials, it’s time to determine the design and style of your wedding arch. The design should complement the overall theme and atmosphere of your wedding. Whether you prefer a classic look, a rustic ambiance, a bohemian feel, a modern touch, or a garden-inspired setting, there is a design and style that will perfectly reflect your vision. Choose a design that resonates with your personal taste and the overall aesthetic of your wedding.
Decorations
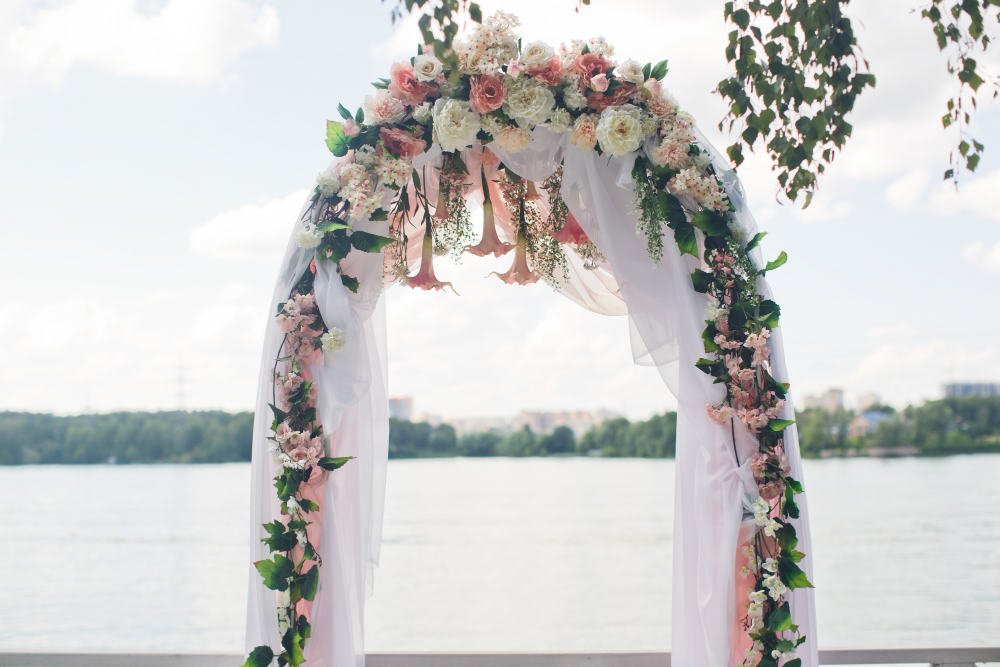
To elevate the beauty of your DIY wedding arch, decorations play a crucial role. Flowers are a timeless choice and can be arranged in various ways, such as cascading garlands or clusters of blooms. Fabric drapes add an ethereal and romantic touch, while greenery brings a natural and organic feel. Ribbons and bows can add a touch of elegance and can be matched to your wedding color palette. Don’t forget to incorporate lights for a magical ambiance during evening ceremonies. Consider the decorations that align with your design and style preferences to create a truly enchanting wedding arch.
Tools
To bring your DIY wedding arch to life, you will need a few essential tools. A drill will be necessary for making holes or attaching brackets. A saw will come in handy if you need to cut the materials to the desired length. A screwdriver will be needed to secure the different components together. Pliers may be necessary for bending or tightening certain parts. Finally, a measuring tape is essential for ensuring accuracy and precise measurements. Having these tools on hand will make the assembly process smoother and more efficient.
Assembly
Now that you have gathered your materials, selected the design, and collected the necessary tools, it’s time to start assembling your DIY wedding arch. Begin by preparing the materials, ensuring they are clean and free from any imperfections or debris. Next, connect the poles or pipes according to your chosen design, securing them with screws or brackets. Once the basic structure is in place, it’s important to ensure the arch’s stability by anchoring it securely. This can be done by either burying the poles in the ground, using sandbags for weight, or attaching the arch to a solid structure. Once the arch is secure, it’s time to add the decorative elements, such as flowers, drapes, greenery, ribbons, and lights. Finally, test the stability of your DIY wedding arch to ensure it can withstand any potential outside forces.
Budget
Establishing and sticking to a budget is an important aspect of any wedding planning process, including DIY wedding arch projects. Begin by determining the overall cost you are willing to allocate to the arch. To stay within your budget, compare prices from different suppliers for the materials you have chosen. Consider opting for cost-effective alternatives, such as repurposing or upcycling items you already have. Additionally, renting materials can be a budget-friendly option if you don’t plan on keeping the arch after the wedding. Decide whether you want to embark on a DIY project or hire a professional, taking into account the costs associated with both options. By carefully considering your budget, you can create a stunning DIY wedding arch without breaking the bank.
Location
The location of your wedding will greatly influence the type of DIY wedding arch you choose. If your ceremony is indoors, you may need to consider the venue’s restrictions or available space. Outdoor weddings offer more flexibility, allowing for larger and more elaborate arch designs. If you are fortunate enough to be tying the knot on a beautiful beach, a beach-inspired wedding arch can enhance the coastal ambiance. A backyard wedding allows you to design an arch that perfectly complements your surrounding landscape. Likewise, a park wedding provides a picturesque setting that can be enhanced with the right arch design. Consider the location of your wedding and how the arch will interact with the surroundings to create a harmonious atmosphere.
Weather Considerations
Considering the weather conditions on your wedding day is crucial, as it can significantly impact the stability and longevity of your DIY wedding arch. If there is a chance of rain, choose materials that are resistant to moisture or consider applying a protective waterproof spray. For windy locations, ensure that your arch is securely anchored and consider using additional weights or stakes. Extreme heat or cold may affect certain materials, so choose materials that can withstand such conditions. It’s also essential to have a backup plan in case of inclement weather, ensuring that your wedding arch can be easily moved indoors or to a covered area if necessary.
Legal Requirements
Before constructing your DIY wedding arch, it’s important to familiarize yourself with any legal requirements or regulations that may apply. Check if permits or licenses are required for building structures at your chosen venue. Ensure that you comply with any safety regulations or structural limitations set by the venue. Consider the insurance coverage for any potential damages or accidents that may occur during the assembly or disassembly process. By following the necessary legal requirements and safety precautions, you can build your DIY wedding arch without any issues or setbacks.
Timeline
Planning and organizing your DIY wedding arch project requires careful consideration of the timeline. Begin by setting aside time for planning and preparation, conducting research, gathering inspiration, and purchasing materials. Estimate the amount of time needed for building and decorating your wedding arch, considering factors such as the complexity of the design, the number of decorative elements, and your DIY skills. Schedule a rehearsal period to ensure the smooth flow of the ceremony and get comfortable with the arch. Determine the logistics of assembling the arch on the wedding day itself, ensuring it aligns with the overall wedding schedule. Finally, plan for the arch’s disassembly, especially if you are responsible for it post-wedding. By creating a comprehensive timeline, you can stay organized and ensure that your DIY wedding arch is completed in time for your special day.
In conclusion, a DIY wedding arch is a beautiful and customizable addition to your wedding ceremony. By carefully selecting materials, designing the arch to match your style, adding decorations, and utilizing the necessary tools, you can create a stunning centerpiece that reflects your unique vision. Consider your budget, location, weather considerations, legal requirements, and the timeline of your wedding planning journey to ensure a seamless DIY wedding arch project. With dedication, creativity, and attention to detail, your DIY wedding arch will become a cherished symbol of your love and a memorable backdrop for your special day.